If you love the classic combination of chocolate and peanut butter, you’re going to adore these homemade peanut butter cups. With simple ingredients, minimal prep, and no baking required, this recipe delivers the iconic flavors of your favorite candy in a fresh, homemade version. Perfect for gifting, sharing, or just enjoying as a sweet treat at home, these peanut butter cups are rich, indulgent, and satisfyingly chocolatey.
Whether you’re a beginner in the kitchen or a seasoned home cook, this recipe is easy to follow and incredibly rewarding. You’ll learn how to layer silky chocolate with a creamy peanut butter center, achieve the perfect glossy finish, and create individually portioned treats that are as beautiful as they are delicious.
Why Homemade Peanut Butter Cups Are Worth Making
While store-bought peanut butter cups are convenient, making them at home has several advantages:
- Customization: Control the sweetness, chocolate type, and size. Use milk, dark, or white chocolate depending on your preference.
- Freshness: Homemade cups are fresher, creamier, and less processed than many store-bought options.
- Dietary Flexibility: You can make them dairy-free, adjust sugar levels, or even use natural peanut butter.
- Fun Activity: Rolling and layering the peanut butter discs is a fun, hands-on activity for cooking with friends, family, or kids.
In just a few easy steps, you can create a snack that tastes gourmet while being totally customizable to your preferences.
Ingredients
Here’s everything you’ll need to make about 6 regular-sized or 12 mini peanut butter cups.
Chocolate Layer
- 16 ounces chocolate chips, divided (~2½ cups) – Any variety of chocolate works: milk, dark, semi-sweet, or white.
- 3 teaspoons coconut oil, divided (optional) – Helps chocolate set faster and achieve a glossy finish.
Peanut Butter Filling
- ½ cup creamy peanut butter – Shelf-stable works best for easy shaping.
- ¼ cup powdered sugar – Sweetens and thickens the peanut butter for shaping.
- ½ teaspoon vanilla extract – Adds warmth and depth of flavor.
- ¼ teaspoon table salt – Enhances the chocolate-peanut butter combination.
Equipment
- Muffin tin (6-cup or 12-cup mini)
- Silicone or paper muffin liners
- Small heat-safe bowls for melting chocolate
- Spoon or spatula for spreading chocolate
- Handheld mixer for mixing peanut butter filling
Step-by-Step Instructions
Follow these detailed instructions for perfectly layered, glossy, and creamy peanut butter cups.
Step 1: Prepare the Muffin Tin
Line your muffin tin with silicone or paper liners. Use a 6-cup tin for regular-sized cups or a 12-cup mini tin for bite-sized treats. This will make removal easy and keep the peanut butter cups neatly shaped.
Step 2: Melt the First Chocolate Layer
Place 1 cup of chocolate chips in a small heat-safe bowl. Microwave in 30-second intervals, stirring between each interval, until only a few chunks remain. Stir well to allow residual heat to melt the remaining chocolate. Add 1 teaspoon of coconut oil and stir until fully incorporated and glossy.
Step 3: Add Chocolate to Muffin Cups
Spoon about ½ tablespoon of melted chocolate into each muffin liner. Use the back of the spoon to spread the chocolate into a thin, even layer covering the bottom of the cup. Chill the muffin tin in the fridge or freezer for 5 minutes to allow the chocolate to harden.
Step 4: Prepare the Peanut Butter Filling
While the chocolate is setting, combine ½ cup creamy peanut butter, ¼ cup powdered sugar, ½ teaspoon vanilla extract, and ¼ teaspoon salt in a medium bowl. Use a handheld mixer on medium speed to blend until smooth and soft enough to shape.
Tip: If using natural peanut butter, add 1–2 tablespoons of powdered sugar to achieve a thicker, cookie-dough-like consistency.
Step 5: Shape Peanut Butter Discs
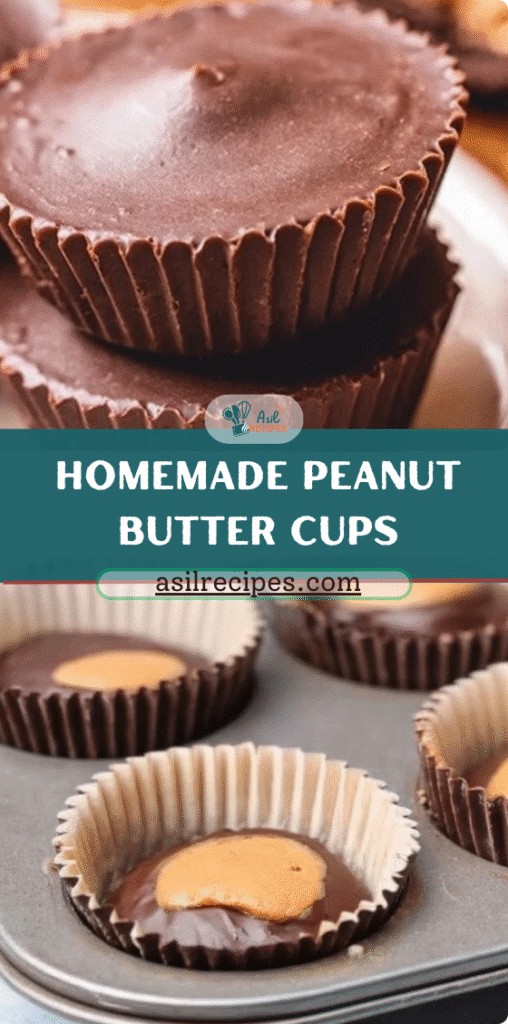
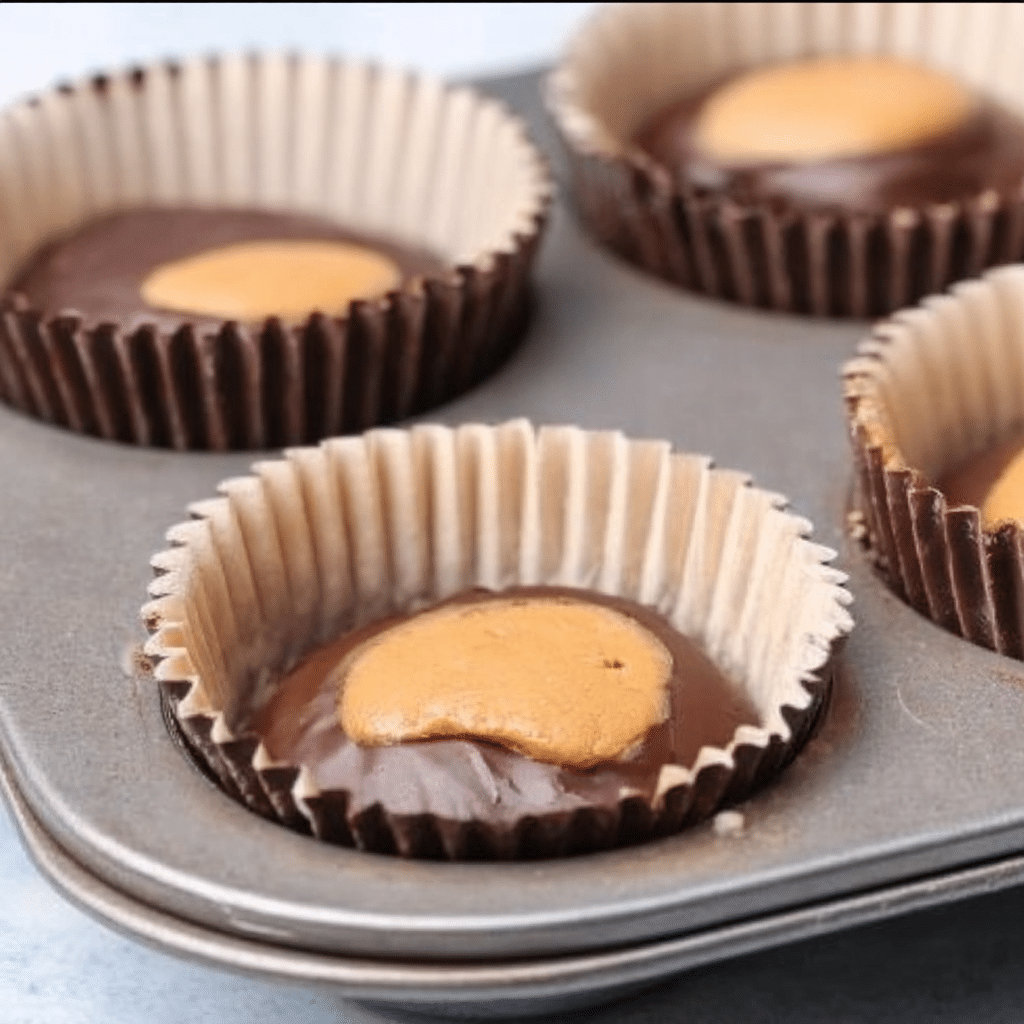
Remove the muffin tin from the fridge. Take about 1 tablespoon of the peanut butter mixture, roll it into a small disc slightly smaller than the chocolate base, and place it into the muffin liner. Repeat for all cups.
Step 6: Melt the Remaining Chocolate
Place the remaining 1½ cups of chocolate chips into a clean small bowl. Microwave in 30-second intervals, stirring in between, until smooth. Add the remaining 2 teaspoons of coconut oil and stir until glossy.
Step 7: Top with Chocolate
Pour about 2 teaspoons of melted chocolate over each peanut butter disc. Use the back of a spoon to smooth the chocolate, fully covering the peanut butter. Let excess chocolate drip down the sides for even coverage.
Step 8: Chill Until Set
Place the muffin tin in the fridge for about 1 hour or in the freezer for 10–15 minutes to set. Once hardened, remove the peanut butter cups from the liners.
Step 9: Store and Serve
Store peanut butter cups in an airtight container in the refrigerator for up to 5 days. For the best taste and texture, allow them to sit at room temperature for 5–10 minutes before serving.
Tips for the Perfect Peanut Butter Cups
- Chocolate Choice Matters: Low-moisture chocolate chips melt better and set with a glossy finish.
- Avoid Overheating Chocolate: Microwave in intervals and stir to prevent burning.
- Shape Quickly: Peanut butter discs are easiest to work with when chocolate is slightly firm but not too hard.
- Customize Size: Make mini cups for snacking or full-size cups for indulgent desserts.
- Add Texture: Mix in chopped peanuts or a sprinkle of sea salt on top for extra crunch and flavor.
Variations
- Dark Chocolate Lovers: Use dark chocolate for a richer, slightly bitter contrast to the sweet peanut butter.
- White Chocolate Twist: White chocolate offers a sweeter, creamier base and pairs beautifully with peanut butter.
- Nut-Free Alternative: Substitute sunflower seed butter for a peanut-free version.
- Vegan/Dairy-Free: Use dairy-free chocolate and a plant-based butter substitute if desired.
Nutrition Information
Approximate nutritional content per regular-sized peanut butter cup (1/6 of recipe):
- Calories: 272 kcal
- Carbohydrates: 30 g
- Protein: 5 g
- Fat: 15 g
- Saturated Fat: 7 g
- Cholesterol: 8 mg
- Sodium: 132 mg
- Potassium: 70 mg
- Fiber: 2 g
- Sugar: 27 g
- Vitamin A: 114 IU
- Vitamin C: 1 mg
- Calcium: 48 mg
Homemade Peanut Butter Cups: The Ultimate No-Bake Treat

With simple ingredients and minimal prep, these Homemade Peanut Butter Cups deliver everything you love about Reese’s in a satisfying no-bake treat.
- Prep Time: 15 minutes
- Cook Time: 0 minutes
- Total Time: 15 minutes + chilling
- Yield: 6 peanut butter cups
- Category: Dessert, Snack
- Method: No-bake
- Cuisine: American
Ingredients
- 16 ounces chocolate chips, divided (~2½ cups)
- 3 teaspoons coconut oil, divided (optional)
- ½ cup creamy peanut butter (shelf-stable preferred)
- ¼ cup powdered sugar
- ½ teaspoon vanilla extract
- ¼ teaspoon table salt
Instructions
- Line a 6-cup muffin tin with silicone or paper liners (or 12-cup mini liners).
- Melt 1 cup chocolate chips in 30-sec microwave intervals, stirring in between. Add 1 tsp coconut oil and stir until glossy.
- Spoon ~½ tbsp chocolate into each muffin cup, spreading evenly. Chill 5 minutes in fridge/freezer.
- Mix ½ cup peanut butter, ¼ cup powdered sugar, ½ tsp vanilla, ¼ tsp salt until smooth. Roll into discs slightly smaller than chocolate base and place in cups.
- Melt remaining 1½ cups chocolate chips with 2 tsp coconut oil using same method. Pour ~2 tsp over peanut butter layer, smoothing the tops.
- Chill in fridge for ~1 hour (or freezer 10–15 min) until hardened.
- Remove peanut butter cups from liners and store in airtight container in fridge up to 5 days. Let sit 5–10 minutes at room temp before serving.
Notes
- Coconut oil helps chocolate set faster and maintain gloss; optional.
- Use any chocolate variety: milk, dark, semi-sweet, or dairy-free.
- Store in airtight container; can be chilled or frozen.
Frequently Asked Questions (FAQs)
1. Can I use crunchy peanut butter instead of creamy?
Yes, but the texture will be slightly different. The filling may be a bit chunkier, but it will still taste delicious.
2. Can I make these ahead of time?
Absolutely! Prepare and assemble them in advance and store in the refrigerator. They are best consumed within 5 days.
3. Can I freeze them?
Yes, peanut butter cups freeze well for up to a month. Thaw in the fridge before serving.
4. Do I have to use coconut oil?
No, coconut oil helps chocolate set faster and look glossy, but you can omit it if desired.
5. Can I use natural peanut butter?
Yes, but add 1–2 extra tablespoons of powdered sugar to thicken the mixture so it’s easy to shape.
Conclusion
Homemade Peanut Butter Cups are a fun, easy, and indulgent treat that rival store-bought favorites. With just a few ingredients and no baking required, you can create perfectly layered chocolate and peanut butter cups in under an hour. Whether you’re making them as a gift, a dessert, or a sweet snack for yourself, these cups are creamy, rich, and satisfyingly chocolatey.
Experiment with chocolate varieties, toppings, or alternative nut butters to make this recipe uniquely yours. Once you try these, you may never reach for store-bought peanut butter cups again!