In the world of Mexican-inspired comfort food, few dishes command as much respect as the enchilada. While traditional recipes often rely on a complex, chili-based red sauce or a tangy tomatillo salsa verde, the Queso Chicken Enchilada takes a different, more decadent route. This dish is a celebration of texture and indulgence, replacing the standard thin sauce with a thick, velvety blanket of melted white queso. By combining the convenience of rotisserie chicken with the foolproof melting properties of Queso Blanco, you can create a restaurant-quality “Quick and Cheesy Dinner Delight” that satisfies the soul and the palate simultaneously.
A professional approach to enchiladas isn’t just about rolling tortillas; it’s about the science of moisture and the balance of spice. In this comprehensive guide, we will break down the mechanics of the perfect creamy filling, the importance of “undrained” aromatics in your sauce, and the technical steps required to ensure your tortillas remain structurally sound while absorbing the maximum amount of flavor. Whether you are a seasoned home cook or a beginner looking for a reliable weeknight win, this 3,000-word deep dive provides the expertise needed to master the art of the cheesy enchilada.
Understanding the Queso Blanco Profile
The term “queso” simply means cheese, but in the context of Tex-Mex cuisine, it refers to a specific type of smooth, molten cheese dip. For this recipe, the use of 16 oz of Queso Blanco Velveeta is a strategic culinary choice. Unlike aged cheeses like sharp cheddar, which can “oil off” or become grainy when subjected to the high heat of an oven, a processed melting cheese provides a stable emulsion.
When this base is combined with diced tomatoes and green chilies, the acidity of the vegetables cuts through the richness of the dairy, creating a bright, balanced sauce. This “Liquid Gold” technique ensures that every inch of the flour tortillas is infused with moisture, preventing the common pitfall of dry, leathery edges that can plague baked pasta and grain dishes.
Essential Ingredients and Substitutions
To achieve a professional result, the quality of your primary ingredients must be balanced with the efficiency of your preparation. Here is a breakdown of what you will need for these Queso Chicken Enchiladas.
For the Enchilada Structure and Filling
- 4 Burrito-Size Flour Tortillas: Large flour tortillas provide a soft, pillowy contrast to the creamy sauce. While corn tortillas are traditional and offer a deeper grain flavor, they require careful warming to prevent cracking. Flour tortillas are more forgiving and better suited for the heavy queso topping.
- 2 Cups Shredded Chicken: Using a pre-cooked rotisserie chicken is a professional “hack” that saves time without sacrificing flavor. The slow-roasted nature of rotisserie chicken ensures the meat is tender enough to shred easily.
- 1 Packet Taco Seasoning: This provides a concentrated blend of cumin, chili powder, garlic, and onion. If you prefer to control your sodium, you can use a homemade blend of these spices.
- 1 Cup Sour Cream: This acts as the binder for the internal filling. For a slightly tangier profile with more protein, Greek yogurt is an excellent 1:1 substitute.
- 1 Cup Shredded Cheddar Cheese: Sharp cheddar adds a necessary bite. Mixing in Monterey Jack is highly recommended for those who want a “cheese pull” effect.
- 1 Can Chopped Green Chilies: These provide a mild, smoky heat. If you prefer a spicier dish, you can substitute these with diced jalapeños.
For the Velvet Queso Sauce
- 16 oz Queso Blanco Velveeta: The star of the show. Cubing the cheese before melting ensures a faster, more even transition to a liquid state.
- 1 Can Diced Tomatoes with Green Chilies: It is vital to keep these undrained. The liquid in the can—often called “tomato juice”—is packed with acidity and salt, which thins the queso to the perfect pouring consistency.
Equipment Needed for a Seamless Workflow
Before beginning, ensure your kitchen is staged with the following tools to maintain a professional “mise en place” (everything in its place):
- Baking Dish: A standard 9×13 inch dish is usually perfect for four large burrito-size tortillas.
- Medium Saucepan: Used for simmering the queso sauce.
- Mixing Bowl: Large enough to comfortably toss the chicken and binders without spilling.
- Whisk or Silicon Spatula: Essential for ensuring the cheese sauce remains smooth and doesn’t scorch on the bottom of the pan.
Step-by-Step Preparation Method
A successful enchilada is all about the “build.” Following these steps in order will ensure your filling is seasoned perfectly and your sauce is at the ideal temperature for baking.
Step 1: Crafting the Internal Filling
The filling of an enchilada should never be an afterthought. In a large mixing bowl, combine your 2 cups of shredded chicken with the taco seasoning, sour cream, shredded cheddar, and the chopped green chilies.
The goal here is a “slurry-like” consistency where every shred of chicken is coated in the creaminess of the sour cream and the grit of the spices. This moisture is crucial; as the enchiladas bake, the internal filling will steam, keeping the chicken succulent. Use a large spoon to fold the ingredients together until the color is uniform—the white sour cream should turn a light orange or tan from the taco seasoning.
Step 2: Emulsifying the Queso Sauce
In your medium saucepan, place the cubed Queso Blanco and the undrained diced tomatoes with green chilies. Set the burner to medium-high heat.
Professional Tip: Do not walk away from the stove during this process. Cheese is delicate and can burn easily if left stationary. Stir continuously with a whisk. As the cubes soften, they will begin to incorporate the tomato juices. Continue cooking until the sauce is completely smooth and “glossy.” If the sauce appears too thick, you can add a tablespoon of milk or water, but generally, the moisture from the canned tomatoes is sufficient for a pourable sauce that will still “set” beautifully in the oven.
Step 3: Rolling and Seaming
Lay your large flour tortillas on a flat, clean surface. Spoon approximately ½ to ¾ cup of the chicken mixture down the center of each tortilla.
When rolling, pull one side of the tortilla over the filling and tuck it slightly underneath the chicken, then continue rolling tightly. This creates a compact cylinder that won’t fall apart. Place the rolled tortillas into a greased baking dish seam-side down. This is a fundamental technique; the weight of the filling keeps the tortilla from unrolling, eliminating the need for toothpicks or messy fasteners.
Step 4: The Sauce Application
Once your four enchiladas are lined up in the dish, pour the hot queso sauce evenly over the top. Use a spatula to spread the sauce to the very edges of the baking dish.
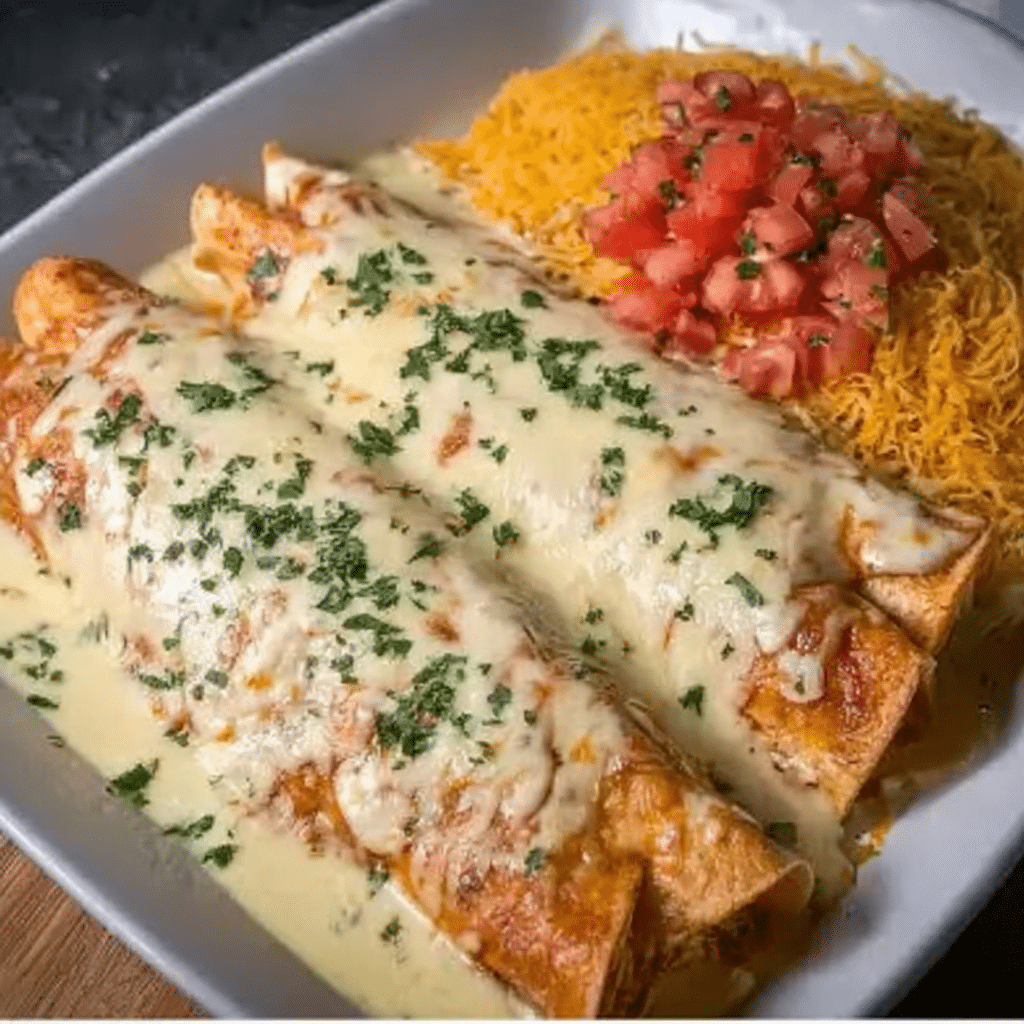
A professional enchilada should be “smothered.” This means no part of the tortilla’s top surface should be exposed to the dry air of the oven. The sauce acts as a protective barrier, steaming the tortilla from the outside in while it bakes. If you have extra shredded cheese, you can sprinkle a little more over the top of the sauce for an extra-crusty finish.
Step 5: The Baking Process
Preheat your oven to 350°F (175°C). Place the baking dish on the center rack and bake for 20 to 25 minutes.
You are looking for specific visual cues: the edges of the sauce should be bubbling vigorously, and the cheese on top should be beginning to develop tiny golden-brown spots. Since the chicken is already cooked, you are simply looking to melt the internal cheese and marry the flavors together.
Step 6: The Rest and Serve
One of the most overlooked steps in professional cooking is the “rest.” Once you remove the enchiladas from the oven, let them sit for 5 to 10 minutes before serving. This allows the queso sauce to thicken slightly and the tortillas to absorb the final bits of moisture. If you cut into them immediately, the sauce may run to the corners of the dish. A rested enchilada holds its shape on the plate, making for a much better presentation.
Pro Tips for Culinary Excellence
To take this recipe from a standard family meal to a “delight,” consider these professional adjustments:
Enhancing the Tortilla Texture
If you have a gas stove, try lightly charring the tortillas over an open flame for 5 seconds per side before filling them. This adds a subtle smokiness that mimics a wood-fired oven. If using corn tortillas, they must be dipped in a little warm sauce or oil before rolling to make them pliable; otherwise, they will snap and leak their filling.
Flavor Customization
To increase the depth of flavor, consider adding a teaspoon of lime juice and a handful of chopped fresh cilantro to the chicken filling. The acidity of the lime brightens the heavy fats of the cheese and sour cream, creating a more “dynamic” bite.
Proper Shredding Technique
When using rotisserie chicken, shred it while it is still slightly warm. Cold chicken tends to clump together, whereas warm chicken separates into long, thin strands that are much better at soaking up the taco seasoning and sour cream.
Frequently Asked Questions
Can I make these ahead of time?
Yes, you can assemble the enchiladas up to 24 hours in advance. However, do not pour the hot queso sauce over them until you are ready to bake. If they sit in the sauce for too long in the fridge, the tortillas will become soggy. Simply store the rolled tortillas in the dish and the sauce in a separate container, then combine and bake when ready.
Can I use a different type of cheese for the sauce?
While Velveeta is used for its superior melting properties, you can make a “from scratch” queso using a roux (butter and flour) mixed with milk and shredded white cheddar or Monterey Jack. Just be aware that a natural cheese sauce requires more attention to prevent it from separating during the baking process.
Is this recipe spicy?
As written, this recipe is mild to medium. The “heat” comes primarily from the canned green chilies and the diced tomatoes with chilies. If you are serving children, look for “mild” versions of these canned goods. If you want more heat, add a diced jalapeño to the chicken filling or a dash of cayenne pepper to the queso sauce.
What should I serve with these enchiladas?
These are very rich, so they pair best with sides that offer a contrast in texture or acidity. A crisp green salad with a lime vinaigrette, Spanish rice, or refried beans are classic choices. For a modern twist, serve them with a side of pickled red onions to cut through the creaminess.
Why did my tortillas get soggy?
Sogginess usually happens if you use too much sauce or if you don’t bake them long enough at a high enough temperature. Ensure your oven is fully preheated and that you don’t exceed the 25-minute mark. Using large flour tortillas also helps, as they are thicker and sturdier than street-taco-sized tortillas.
Can I freeze these enchiladas?
You can freeze the assembled enchiladas (without the sauce). When you’re ready to eat, thaw them in the fridge overnight, make a fresh batch of queso sauce, and bake as directed. Freezing the queso sauce itself is not recommended, as the texture can become grainy upon thawing.
Can I use beef instead of chicken?
Absolutely. Ground beef seasoned with taco seasoning works beautifully in this recipe. Just be sure to drain the grease from the beef thoroughly before mixing it with the sour cream and cheese to prevent the enchiladas from becoming overly oily.
Do I have to use a saucepan for the sauce?
If you’re in a hurry, you can melt the cheese and tomatoes in a microwave-safe bowl in 30-second increments, stirring in between. However, the stovetop method is preferred because it allows for more control and ensures a perfectly smooth emulsion without hot spots.
Conclusion
The Queso Chicken Enchilada is a masterclass in the “more is more” philosophy of comfort cooking. By focusing on the quality of the melt and the seasoning of the protein, you transform simple ingredients into a dish that feels like a luxury. The combination of the tangy sour cream filling and the silky white queso topping creates a flavor profile that is both familiar and exciting.
Remember that the key to a professional result is in the small details: the seam-side down placement, the undrained tomato juices, and the crucial resting period before serving. This recipe is designed to be a reliable, “quick” solution for a busy life, providing a cheesy dinner delight that never fails to impress. As you pull the bubbling, golden dish from the oven, you’ll realize that the perfect dinner isn’t always the most complicated one—sometimes, it’s the one with the most queso. Enjoy your culinary creation!
PrintThe Ultimate Guide to Creamy Queso Chicken Enchiladas

Queso Chicken Enchiladas are ultra creamy, cheesy, and packed with seasoned chicken, wrapped in tortillas and baked in a rich queso blanco sauce.
- Prep Time: 15 minutes
- Cook Time: 25 minutes
- Total Time: 40 minutes
- Yield: 4 servings
- Category: Main Dish, Enchiladas
- Method: Bake
- Cuisine: Mexican-American
Ingredients
Enchiladas
- 4 burrito-size flour tortillas (or corn tortillas, warmed)
- 2 cups shredded chicken (rotisserie works great)
- 1 packet taco seasoning
- 1 cup sour cream (or Greek yogurt)
- 1 cup shredded cheddar cheese (or mix with Monterey Jack)
- 1 can chopped green chilies
- 1 can diced tomatoes with green chilies (undrained)
- 16 oz queso blanco (Velveeta or similar)
Instructions
- In a large bowl, mix shredded chicken, taco seasoning, sour cream, cheddar cheese, and green chilies until well combined.
- In a saucepan, melt queso blanco with undrained diced tomatoes over medium heat, stirring until smooth.
- Fill each tortilla with ½–¾ cup of chicken mixture, roll tightly, and place seam-side down in a greased baking dish.
- Pour queso sauce evenly over the enchiladas.
- Bake at 350°F (175°C) for 20–25 minutes until bubbly and heated through.
- Let cool slightly before serving.
Notes
- Use rotisserie chicken for faster prep.
- Add jalapeños for extra heat.
- Serve with rice or salad for a full meal.