In the modern culinary landscape, few flavor profiles have captured the public imagination quite like the “dill pickle” craze. From snacks to infused spirits, the briny, herbal, and acidic punch of a classic dill pickle is universally loved. However, when you marry that specific tang with the savory depth of Parmesan cheese and the comforting crunch of a golden breadcrumb crust, you create something truly transcendent: Crispy Dill Pickle Parmesan Chicken.
This dish is not merely a recipe; it is an exploration of the science of brining and the art of the perfect breading. It transforms the humble boneless, skinless chicken breast—often criticized for being dry or bland—into a succulent, flavor-packed centerpiece. Whether you are a seasoned home cook or a beginner looking to impress at the dinner table, this guide will walk you through every nuance of this “game-changer” meal.
The Secret is in the Brine: An Introduction
To understand why this chicken is so uniquely juicy, we must first look at the role of the dill pickle juice. Most people discard the liquid in the pickle jar once the pickles are gone, but in the world of professional cooking, that liquid is a high-value ingredient. Pickle juice is essentially a pre-made brine consisting of vinegar, salt, water, and aromatics like dill, garlic, and mustard seed.
When you soak chicken in pickle juice, two critical processes occur. First, the salt in the brine denatures the proteins in the meat, allowing the muscle fibers to relax and absorb more moisture. This ensures the chicken remains tender even during the high-heat frying process. Second, the vinegar acts as a mild tenderizer, while the dill infusion penetrates deep into the meat, providing a subtle, zesty undertone that balances the richness of the Parmesan crust.
The result is a dish that hits every part of the palate: the salt from the brine, the acid from the vinegar, the “umami” from the Parmesan, and the satisfying texture of the seasoned breadcrumbs. It is comfort food elevated by culinary logic.
Essential Components: The Ingredients
Consistency in cooking begins with the quality of your mise en place. To prepare four servings of this Crispy Dill Pickle Parmesan Chicken, you will need the following ingredients:
- 4 Boneless, Skinless Chicken Breasts: Look for breasts of uniform size to ensure even cooking. If they are particularly thick, you may want to butterfly them or gently pound them to an even thickness.
- 1 Cup Dill Pickle Juice: This should come straight from a jar of your favorite dill pickles. Ensure it is a “dill” variety rather than “sweet” or “bread and butter” to maintain the savory profile.
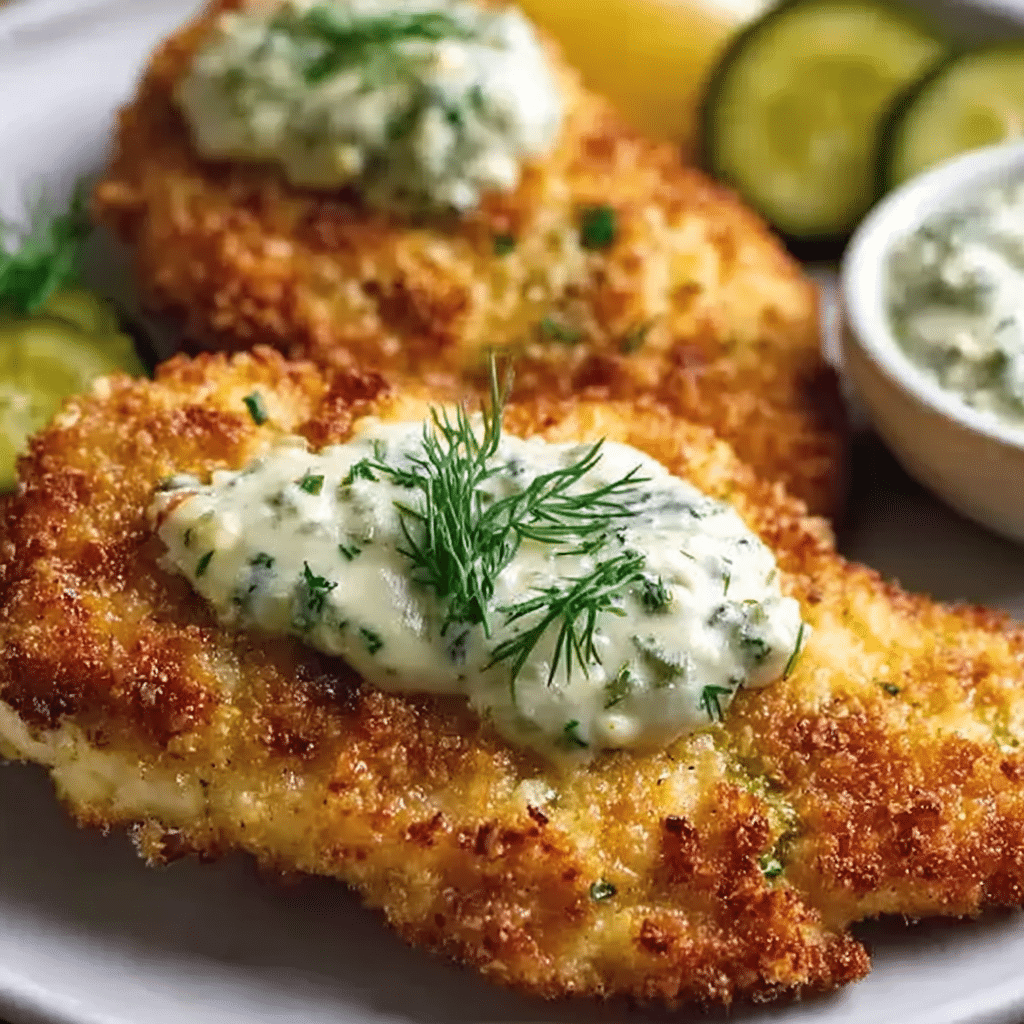
- 1 Cup Seasoned Breadcrumbs: These provide the primary structure for the crunch. Seasoned crumbs usually contain a blend of Italian herbs which complement the Parmesan.
- 1/2 Cup Grated Parmesan Cheese: Use finely grated Parmesan (the texture of sand) rather than shredded shreds. The fine grain mixes more evenly with the breadcrumbs for a consistent crust.
- 1/2 Cup All-Purpose Flour: This serves as the “primer” for the chicken, giving the egg something to cling to.
- 2 Large Eggs: Whisked thoroughly, these act as the “glue” that binds the breading to the flour-coated chicken.
- 1 tsp Garlic Powder: Adds a savory, aromatic punch to the flour base.
- 1 tsp Onion Powder: Provides a subtle sweetness and depth.
- 1/2 tsp Paprika: Offers a hint of earthiness and aids in achieving that deep golden-brown color during frying.
- Salt and Pepper: To be used sparingly in the flour mixture, as the pickle juice and Parmesan already provide significant salinity.
- Cooking Oil: Choose an oil with a high smoke point, such as vegetable, canola, or grapeseed oil. You will need enough to fill your skillet to a depth of about 1/2 inch.
The Professional Method: Step-by-Step Preparation
Execution is everything. By following this structured approach, you ensure a crust that stays attached to the meat and a center that remains incredibly moist.
1. The Brining Phase
Place your 4 chicken breasts into a shallow dish or a heavy-duty zip-top bag. Pour the 1 cup of dill pickle juice over the chicken, ensuring every piece is completely submerged. Seal the bag or cover the dish and place it in the refrigerator.
The duration is key: a minimum of 30 minutes is required for the flavors to penetrate, but for the most “game-changing” results, aim for 2 hours. Do not exceed 4 hours, as the acidity of the vinegar can eventually begin to break down the meat fibers too much, resulting in a mushy texture.
2. The Standard Breading Procedure (SBP)
To achieve a crust that doesn’t fall off in the pan, you must follow the three-stage breading process. Set up three shallow dishes in a row:
- Dish 1 (The Base): Mix the 1/2 cup of all-purpose flour with the garlic powder, onion powder, paprika, salt, and pepper.
- Dish 2 (The Binder): The 2 large eggs, whisked until no streaks of white remain.
- Dish 3 (The Crust): Combine the 1 cup of seasoned breadcrumbs and the 1/2 cup of grated Parmesan cheese.
Remove the chicken from the pickle juice and—this is a vital step—pat it dry with paper towels. If the chicken is too wet, the flour will turn into a paste and slide off during frying.
Dredge each piece in the flour (shaking off the excess), dip it into the egg wash (letting the extra drip off), and finally press it firmly into the breadcrumb-Parmesan mixture. Ensure the coating is thick and even on all sides.
3. The Sizzle: Frying to Perfection
Heat a large skillet over medium-high heat and add enough cooking oil to reach a depth of 1/2 inch. You want the oil to be hot—around 350°F (175°C). You can test this by dropping a few breadcrumbs into the oil; if they sizzle immediately, you are ready.
Carefully place the chicken in the skillet using tongs. Do not crowd the pan; if necessary, cook in two batches. Crowding the pan drops the oil temperature, leading to greasy, soggy breading.
Fry the chicken for 5–7 minutes per side. The goal is a deep, golden-brown exterior. Use an instant-read thermometer to ensure the internal temperature reaches 165°F (74°C).
4. The Rest and Recovery
Once cooked, transfer the chicken to a wire rack set over a baking sheet. Avoid draining the chicken on paper towels, as the steam trapped underneath can make the bottom crust soggy. The wire rack allows air to circulate around the entire cutlet, keeping it crispy. Let the chicken rest for 3–5 minutes. This allows the juices to redistribute through the meat, ensuring that first bite is as moist as possible.
Culinary Science: Why This Recipe Works
The Emulsified Crust
The inclusion of Parmesan cheese in the breading does more than add flavor. Parmesan is a low-moisture, high-fat cheese. As the chicken fries, the fat in the cheese melts slightly into the breadcrumbs, essentially “frying” the crumbs from the inside out and creating a shatteringly crisp barrier.
The Power of the “Pat Dry”
Many home cooks skip drying the meat after brining. However, moisture is the enemy of a crisp crust. By patting the chicken dry, you ensure the flour creates a mechanical bond with the surface of the meat. The egg then bonds to the dry flour, and the breadcrumbs bond to the egg. Without that initial dry surface, the entire “shell” of the chicken is likely to peel away in one piece when you cut into it.
Heat Management
The use of medium-high heat is intentional. It is high enough to brown the breadcrumbs before the chicken overcooks, but not so high that the Parmesan burns. Cheese has a lower burning point than flour or breadcrumbs, so maintaining a steady 350°F is the “sweet spot” for this specific recipe.
Serving Suggestions and Pairings
This chicken is a versatile powerhouse. To lean into the “comfort food” theme, serve it alongside:
- Garlic Mashed Potatoes: The creamy texture of the potatoes provides a wonderful foil to the crunch of the chicken.
- Dill Pickle Slaw: Double down on the theme by making a vinegar-based coleslaw featuring chopped pickles and fresh dill.
- Honey Mustard or Ranch: These classic dipping sauces complement the tang of the pickle juice and the saltiness of the Parmesan perfectly.
For a lighter option, slice the warm chicken and serve it over a crisp Caesar salad. The Parmesan in the dressing and the Parmesan in the chicken crust create a sophisticated, layered flavor profile.
Nutritional Insights
Each cutlet provides approximately 460 kcal. The dish is a significant source of protein (from the chicken and eggs) and calcium (from the Parmesan). By using the wire rack draining method, you minimize the amount of residual oil the chicken carries to the plate, keeping the meal satisfying without being overly heavy.
Conclusion: A New Family Favorite
The Crispy Dill Pickle Parmesan Chicken is more than the sum of its parts. It uses the humble pickle jar to solve the age-old problem of dry chicken breasts while introducing a sophisticated, cheesy crust that satisfies the need for crunch. It is a 30-minute active-time meal that tastes like it took hours of preparation.
By mastering the brine and the three-stage breading process, you add a formidable technique to your culinary repertoire. This dish proves that innovative flavors can be found in the most common pantry items—all it takes is a little bit of kitchen science and a love for the “crunch.”
Frequently Asked Questions (FAQ)
Q: Does the chicken actually taste like pickles? A: Yes, but in a balanced way. The pickle juice provides a distinct “tang” and an herbal dill aroma, but it does not overwhelm the savory flavors of the Parmesan and garlic. It tastes more like a sophisticated, pre-seasoned piece of poultry rather than a literal pickle.
Q: Can I bake this instead of frying it? A: You can, though the texture will be slightly different. To bake, preheat your oven to 400°F (200°C). Place the breaded chicken on a wire rack over a baking sheet and spray both sides generously with cooking spray. Bake for 20–25 minutes until the internal temperature reaches 165°F. The wire rack is essential here to prevent a soggy bottom.
Q: Can I use an Air Fryer? A: Yes! The air fryer is excellent for this recipe. Pre-heat to 375°F (190°C). Spray the basket and the chicken with oil. Air fry for 12–15 minutes, flipping halfway through, until golden and cooked through.
Q: I don’t have seasoned breadcrumbs. Can I use Panko? A: Panko is an excellent substitute and will actually provide an even crunchier texture. If using Panko, add an extra 1/2 teaspoon of dried Italian seasoning or oregano to the mixture to compensate for the lack of seasoning in the crumbs.
Q: Is it safe to use pickle juice that has had pickles in it? A: Absolutely. The vinegar and salt in the juice make it a very stable environment. As long as the pickles were kept refrigerated and the juice hasn’t developed an off-smell or cloudiness, it is perfectly safe to use as a brine.
Q: My breading is falling off in the pan. What am I doing wrong? A: This usually happens for three reasons: the chicken wasn’t patted dry before the flour stage, the oil wasn’t hot enough when you started, or you flipped the chicken too early. Let the first side develop a solid, golden crust before attempting to flip it.
Q: Can I use this method for chicken thighs? A: Yes. Boneless, skinless thighs are naturally juicier and work beautifully with this recipe. Note that thighs may take slightly longer to cook (about 7–9 minutes per side) and should be cooked to an internal temperature of 170°F-175°F for the best texture.
Q: Is the Parmesan cheese necessary? A: While you could make pickle-brined chicken without it, the Parmesan is what provides the savory “umami” balance to the acidic brine. It also contributes significantly to the crispness of the crust. If you are dairy-free, you can substitute with a vegan Parmesan or nutritional yeast.
Q: How do I store and reheat leftovers? A: Store in an airtight container in the fridge for up to 3 days. To maintain the crunch, avoid the microwave. Instead, reheat in a 350°F oven or an air fryer for 5 minutes until warmed through and the crust has re-crisped.
Q: Can I make the chicken ahead of time? A: You can bread the chicken up to 4 hours in advance. Keep the breaded cutlets on a parchment-lined plate in the refrigerator. This actually helps the breading set and adhere even better to the meat.
Q: What kind of oil is best for frying? A: Avoid butter or extra virgin olive oil for the frying stage, as they have low smoke points and will burn before the chicken is cooked. Use neutral oils like canola, vegetable, or peanut oil for the best results.
Q: Can I use this brine for other meats? A: Pickle juice brining works exceptionally well for pork chops and even turkey breast. The science of the salt and acid remains the same across different white meats.
Q: How do I get a really thick crust? A: If you prefer a “heavy” breading, you can perform a “double dredge.” After the first dip in the egg and breadcrumbs, dip the chicken back into the egg and then back into the breadcrumbs a second time. This will create a very thick, restaurant-style shell.
PrintThe Definitive Guide to Crispy Dill Pickle Parmesan Chicken: A Fusion of Tang and Crunch

This Crispy Dill Pickle Parmesan Chicken is marinated in dill pickle juice for unbeatable juiciness, then coated in a Parmesan-breadcrumb crust and fried to golden perfection.
- Prep Time: 15 minutes
- Cook Time: 15 minutes
- Total Time: 1 hour
- Yield: 4 cutlets
- Category: Dinner, Main Dish
- Method: Fry
- Cuisine: American
Ingredients
- 4 boneless, skinless chicken breasts
- 1 cup dill pickle juice (from a jar of pickles)
- 1 cup seasoned breadcrumbs
- 1/2 cup grated Parmesan cheese
- 1/2 cup all-purpose flour
- 2 large eggs, whisked
- 1 tsp garlic powder
- 1 tsp onion powder
- 1 tsp paprika
- salt and pepper, to taste
- cooking oil, for frying
Instructions
- Place chicken breasts in a shallow dish or zip-top bag. Cover with dill pickle juice and marinate in the fridge for 30 minutes to 2 hours.
- Set up three shallow dishes: flour mixed with garlic powder, onion powder, paprika, salt & pepper; whisked eggs; and Parmesan mixed with breadcrumbs.
- Remove chicken from brine and pat dry. Dredge each piece in flour, dip in egg, then press into breadcrumb-Parmesan mixture until coated.
- Heat 1/2 inch of oil in a large skillet over medium-high. Fry chicken 5–7 minutes per side, until golden brown and cooked through (165°F internal temp).
- Transfer to a wire rack to drain excess oil. Rest a few minutes before serving hot.
Notes
- Don’t marinate longer than 4 hours or the acid in the pickle juice will change the texture of the chicken too much.
- Serve with extra pickles and ranch dressing for dipping!