Introduction: The 15-Minute Dinner That Delivers on Flavor and Nutrition
There is a small but mighty category of recipes that every home cook needs in their back pocket: dishes that are fast enough for the busiest weeknight, healthy enough to feel good about serving to your family, and flavorful enough that no one feels like they are eating “diet food.” The High-Protein Honey Garlic Shrimp is the undisputed champion of this category. In just 15 minutes, with a single skillet and a handful of pantry ingredients, you can create a meal that is sweet, savory, garlicky, and utterly irresistible—while packing an impressive protein punch.
Let us talk about shrimp for a moment. Shrimp is one of the most efficient sources of high-quality protein available. A single pound of shrimp contains about 100 grams of protein, with very little fat and fewer than 500 calories. It cooks in minutes, absorbs flavors beautifully, and feels luxurious despite being surprisingly affordable (especially when purchased frozen). For anyone looking to increase their protein intake—whether for muscle building, weight management, or simply staying full between meals—shrimp is an absolute superstar.
The honey garlic sauce in this recipe is the perfect complement to the delicate sweetness of the shrimp. Honey provides natural, complex sweetness and helps the sauce caramelize into a glossy, sticky coating. Fresh garlic (four whole cloves—this is not a recipe for the garlic-faint of heart) infuses the oil with pungent, aromatic depth. Soy sauce adds salty umami that balances the sweetness. And a touch of olive oil ties everything together while providing healthy monounsaturated fats.
What makes this recipe particularly brilliant is its efficiency. The sauce comes together in a single bowl. The shrimp cook in minutes. The entire process, from rinsing the shrimp to garnishing the finished dish, takes less time than ordering takeout and waiting for delivery. Yet the result tastes like something from a high-end Asian-fusion restaurant, with glossy, caramelized shrimp that are tender, juicy, and bursting with flavor.
This recipe is also remarkably versatile. It is naturally gluten-free (with the right soy sauce) and can be made Paleo, Whole30, or low-carb with simple substitutions (see the FAQ section). It scales easily for crowds, works with chicken or tofu instead of shrimp, and can be served over rice, noodles, zucchini noodles, or cauliflower rice—or simply eaten on its own as a high-protein snack.
In this article, we will explore every nuance of the High-Protein Honey Garlic Shrimp. We will discuss the best ingredients, from choosing the right shrimp to understanding the optional cornstarch. We will walk through a detailed, step-by-step method that ensures success, whether you are a shrimp-cooking novice or a seasoned seafood pro. Finally, we will answer the most frequently asked questions, offering substitutions, storage tips, and creative variations to make this recipe a permanent fixture in your healthy dinner rotation.
Heat your skillet. It is time to cook something fast, healthy, and unforgettable.
Ingredients: The Building Blocks of Sweet, Savory, Garlicky Perfection
Before we fire up the stove, let us take a moment to understand each ingredient. This recipe has just eight core components (plus garnishes), but each one plays a critical role. Below is the complete list, followed by detailed notes on selection, quality, and potential substitutions.
The Core Ingredients:
- 1 pound large shrimp, peeled and deveined
- ¼ cup honey
- 4 cloves garlic, minced
- 2 tablespoons soy sauce
- 1 tablespoon olive oil
- 1 teaspoon cornstarch (optional, for thickening)
- Salt and pepper to taste
- 2 green onions, sliced (for garnish)
- Sesame seeds (optional, for garnish)
Cook Mode Note: As you prepare this recipe, you may want to prevent your screen from going dark. Most devices offer a “stay awake” or “cook mode” setting in their display options, allowing you to reference the instructions without constantly tapping the screen.
Ingredient Deep Dive
1. Large Shrimp (1 pound, peeled and deveined)
Shrimp is the protein star of this dish, and choosing the right shrimp makes all the difference. “Large” shrimp typically means size 21/25 or 26/30, which indicates how many shrimp are in a pound (21–25 shrimp per pound is considered large). Larger shrimp are more forgiving to cook and provide a more satisfying bite. Look for shrimp that are peeled and deveined to save time; if you buy them with shells on, you will need to peel and devein them yourself (save the shells for making shrimp stock). Fresh or frozen both work well—if using frozen, thaw them completely in the refrigerator overnight or under cold running water for 10–15 minutes. Pat the shrimp completely dry with paper towels before cooking; excess moisture prevents browning.
2. Honey (¼ cup)
Honey is the primary sweetener and the source of the dish’s signature sticky glaze. It adds natural, floral sweetness that caramelizes beautifully in the hot skillet. Use a mild honey like clover or wildflower; strong-flavored honey (like buckwheat or manuka) can overpower the shrimp. If you do not have honey, maple syrup or agave nectar can substitute, though the flavor will be slightly different. For a low-sugar version, use a sugar-free honey substitute (like sugar-free maple syrup) or reduce the honey to 2 tablespoons and add 2 tablespoons of water.
3. Garlic (4 cloves, minced)
Four cloves of garlic is not a typo—this recipe is intentionally garlic-forward. The garlic is minced finely so it distributes evenly through the sauce and cooks quickly without burning. As it hits the hot oil, it releases its aromatic compounds, infusing the entire dish with pungent, sweet, nutty flavor. For the best results, use fresh garlic cloves rather than pre-minced jarred garlic, which often contains preservatives and has a flat, bitter taste. If you are sensitive to garlic, reduce to 2–3 cloves.
4. Soy Sauce (2 tablespoons)
Soy sauce provides salty umami that balances the sweetness of the honey and creates a savory depth. Use regular or low-sodium soy sauce. For a gluten-free version, use tamari or coconut aminos (coconut aminos are sweeter, so you may want to reduce the honey slightly). Do not use dark soy sauce, which is thicker and less salty.
5. Olive Oil (1 tablespoon, plus additional for cooking)
Olive oil is used both in the sauce mixture and for cooking the shrimp. It adds healthy monounsaturated fats and a fruity, peppery flavor. Extra-virgin olive oil is ideal. If you prefer a more neutral flavor, avocado oil or vegetable oil can substitute. Note: the recipe calls for olive oil in the sauce mixture (1 tablespoon) and also instructs you to “heat oil in a skillet” for cooking; this is a slight inconsistency. For clarity, use 1 tablespoon in the sauce and an additional 1–2 tablespoons for cooking the shrimp.
6. Cornstarch (1 teaspoon, optional)
Cornstarch is a natural thickener. When mixed with the cold sauce ingredients, it creates a slurry that thickens the sauce as it heats, resulting in a glossier, more clinging glaze. The recipe notes that cornstarch is optional—if you prefer a thinner, more pourable sauce, omit it. If you want a thick, sticky, restaurant-style glaze, include it. For a gluten-free thickener, cornstarch is already gluten-free; arrowroot powder or potato starch can substitute in the same quantity.
7. Salt and Pepper (to taste)
These foundational seasonings enhance the natural flavor of the shrimp. Go easy on the salt because the soy sauce already contributes significant sodium. Freshly ground black pepper adds a subtle warmth and bite.
8. Green Onions (2, sliced, for garnish)
Green onions (scallions) add a fresh, mild onion flavor and a pop of bright green color. Slice them thinly, including both the white and green parts. Add them at the very end to preserve their crisp texture and fresh flavor.
9. Sesame Seeds (optional, for garnish)
Sesame seeds add a nutty flavor and visual appeal. Toasted sesame seeds are more flavorful than raw. They are optional but highly recommended for that restaurant-style finish.
Preparation Method: Step-by-Step to Honey Garlic Perfection
Now, we move from ingredient appreciation to action. Follow these instructions carefully, and you will be rewarded with perfect High-Protein Honey Garlic Shrimp. The total active time is approximately 15 minutes.
Step 1: Prepare the Shrimp (3–5 minutes)
Action: If your shrimp are frozen, thaw them completely. The safest method is to place them in the refrigerator overnight. For a faster thaw, place the sealed bag of shrimp in a bowl of cold water for 10–15 minutes (change the water halfway through). Do not use warm or hot water, which can begin to cook the shrimp unevenly.
Once thawed, rinse the shrimp under cold water. If they are not already peeled and deveined, remove the shells (save them for stock if desired) and make a shallow cut along the back of each shrimp to remove the dark vein. Pat the shrimp completely dry with paper towels. This step is critical—excess moisture prevents browning.
Season the shrimp lightly with salt and pepper.
Why this matters: Patting the shrimp dry removes surface moisture that would otherwise create steam in the skillet, preventing the shrimp from browning. A proper sear on the shrimp adds flavor, texture, and visual appeal. Removing the vein is not just for aesthetics; the vein can contain grit and has a slightly bitter taste.
Pro Tip: Leave the tails on if you prefer (they make for easy handling and a beautiful presentation), or remove them for easier eating. If leaving tails on, be careful not to burn them in the hot skillet.
Step 2: Make the Honey Garlic Sauce (2 minutes)
Action: In a small bowl, combine the following ingredients:
- ¼ cup honey
- 4 cloves garlic, minced
- 2 tablespoons soy sauce
- 1 tablespoon olive oil
- 1 teaspoon cornstarch (optional—skip if you prefer a thinner sauce)
Whisk until the honey is fully incorporated and the cornstarch (if using) is completely dissolved. The mixture should be smooth and uniform. Set aside.
Why this matters: Mixing the sauce in advance allows you to focus on cooking the shrimp without scrambling to measure ingredients. The cornstarch must be fully dissolved to prevent lumps in the finished sauce. If you are skipping the cornstarch, the sauce will be thinner but still flavorful.
Pro Tip: If you have time, let the sauce sit for 5–10 minutes. This allows the garlic to infuse the honey and soy sauce, deepening the flavor.
Step 3: Cook the Shrimp (3–4 minutes)
Action: Place a large skillet (12-inch) over medium-high heat. Add 1–2 tablespoons of olive oil (or avocado oil) to the skillet. Swirl to coat the bottom.
Once the oil is shimmering and hot (but not smoking), add the shrimp in a single layer. Do not overcrowd the skillet—if necessary, cook in two batches. Overcrowding will cause the shrimp to steam rather than sear.
Let the shrimp cook undisturbed for 1–2 minutes. You will see the edges turning pink and opaque. Using tongs or a spatula, flip each shrimp to the other side. Cook for another 1–2 minutes until the shrimp are pink, opaque throughout, and curled into a loose “C” shape. The shrimp should be firm to the touch but still springy. Do not overcook—shrimp that are curled into a tight “O” shape are overcooked and rubbery.
Why this matters: Shrimp cook very quickly—usually 2–4 minutes total depending on their size. Cooking them in a single layer over high heat ensures a good sear (browning) on the outside while keeping the inside tender and juicy. The “C” shape is the visual cue for perfectly cooked shrimp. Overcooked shrimp become tough, rubbery, and dry.
Pro Tip: If you are cooking in batches, transfer the first batch of cooked shrimp to a plate and keep them warm while you cook the second batch. Do not stack them; spread them out so they do not continue cooking from residual heat.
Step 4: Add the Sauce and Simmer (3–5 minutes)
Action: Reduce the heat to medium-low. Pour the prepared honey garlic sauce over the cooked shrimp. Toss or stir gently to coat each shrimp evenly.
Let the sauce simmer gently for 3–5 minutes, stirring occasionally. The sauce will thicken (especially if you used cornstarch), become glossy, and cling to the shrimp. If the sauce seems too thick, add a splash of water (1–2 tablespoons) to thin it. If it seems too thin, let it simmer for an additional minute or two to reduce.
The shrimp are done when the sauce is thick and sticky, and the shrimp are heated through (they are already cooked, so you are just warming them in the sauce).
Why this matters: Simmering the sauce allows the honey to caramelize slightly and the garlic to mellow, creating a complex, balanced flavor. The cornstarch (if used) activates at a simmer, thickening the sauce into a glossy glaze that clings to the shrimp. Reducing the heat prevents the honey from burning.
Pro Tip: Taste the sauce at this stage. If it needs more salt, add a splash of soy sauce. If it needs more sweetness, add a drizzle of honey. If it needs acidity to balance the sweetness, add a teaspoon of rice vinegar or a squeeze of lemon juice.
Step 5: Garnish and Serve (1 minute)
Action: Remove the skillet from the heat. Transfer the honey garlic shrimp to a serving platter or individual bowls. Sprinkle generously with sliced green onions and sesame seeds (optional) . Serve immediately.
Why this matters: The green onions add a fresh, crisp contrast to the sticky, sweet glaze. Sesame seeds add nutty flavor and visual appeal. Serving immediately ensures the shrimp are at their peak—hot, tender, and coated in glossy sauce.
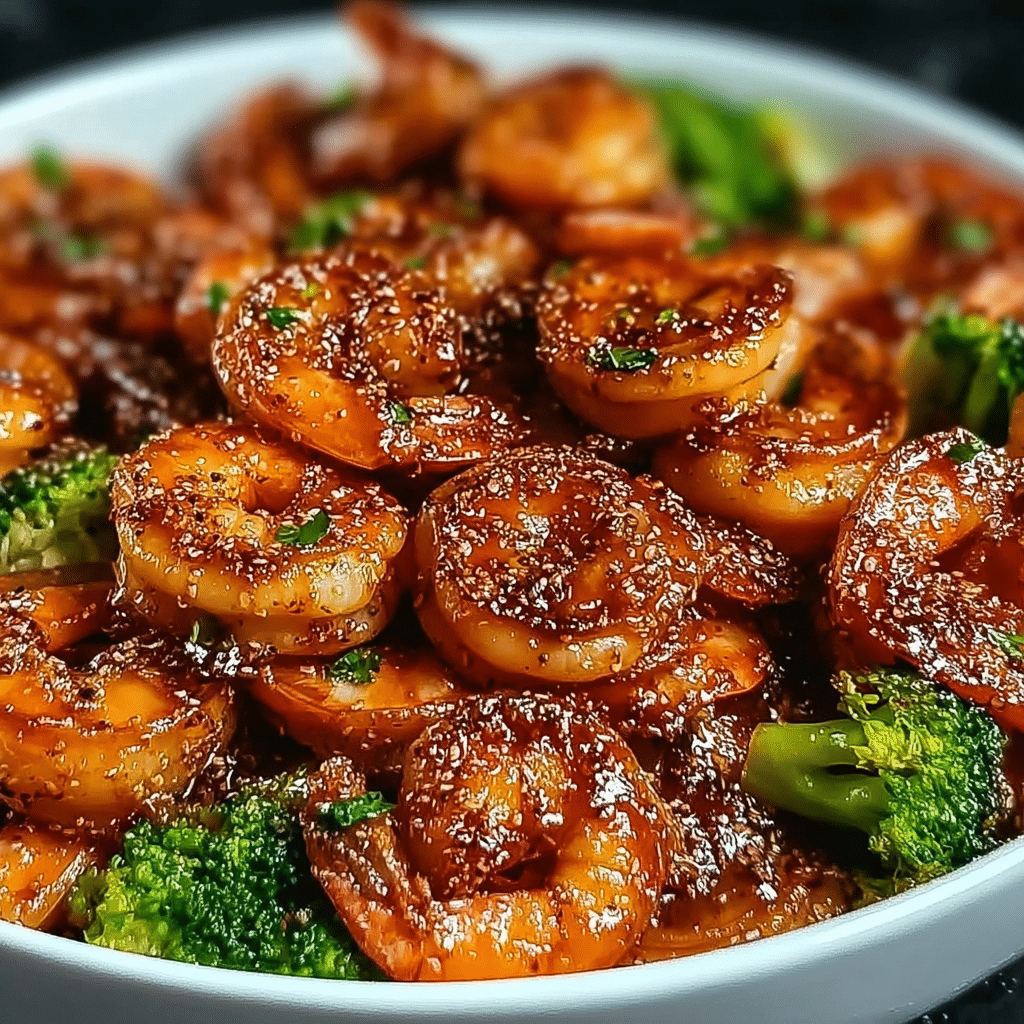
Pro Tip: For a complete meal, serve the shrimp over steamed jasmine rice, brown rice, cauliflower rice, zucchini noodles, or lo mein noodles. The sauce is delicious drizzled over the starch as well. A side of steamed broccoli or snap peas complements the dish beautifully.
Conclusion: Fast, Healthy, and Bursting with Flavor
The High-Protein Honey Garlic Shrimp is proof that healthy eating does not have to mean bland, boring, or time-consuming. In just 15 minutes, with a single skillet and a handful of pantry ingredients, you can create a meal that is sweet, savory, garlicky, and deeply satisfying—while delivering over 50 grams of protein per serving (assuming two servings from the recipe).
What makes this recipe so successful is its balance. The honey provides natural sweetness without being cloying. The garlic adds pungent depth. The soy sauce contributes salty umami. The shrimp are tender and juicy, a perfect vehicle for the glossy glaze. And the entire dish comes together faster than you could order takeout.
This recipe is also a template for creativity. Once you master the basic technique, you can experiment with different proteins (chicken, tofu, salmon), different sweeteners (maple syrup, brown sugar), different aromatics (ginger, chili flakes, lemongrass), and different serving styles (over rice, in lettuce wraps, as a taco filling). The possibilities are endless, and the results are always delicious.
So thaw those shrimp, mince that garlic, and heat that skillet. Your new favorite healthy dinner is just minutes away.
Frequently Asked Questions (FAQ)
1. Can I use frozen shrimp for this recipe?
Yes. Frozen shrimp are often frozen at sea, which can actually make them fresher than “fresh” shrimp that have been sitting at the fish counter. Thaw them completely before cooking. The safest method is to place them in the refrigerator overnight. For a faster thaw, place the sealed bag of shrimp in a bowl of cold water for 10–15 minutes (change the water halfway through). Do not use warm or hot water, which can begin to cook the shrimp unevenly. Once thawed, pat them completely dry before cooking.
2. Can I use pre-cooked shrimp?
Pre-cooked shrimp are not recommended for this recipe. They have already been cooked once and will become rubbery and tough when heated again in the sauce. If you only have pre-cooked shrimp, add them at the very end (after the sauce has simmered and thickened) and toss just to warm through—about 30 seconds. Do not simmer them.
3. Can I make this recipe without cornstarch?
Absolutely. The cornstarch is optional. Without it, the sauce will be thinner and more pourable (less of a sticky glaze). The dish will still be delicious. If you omit the cornstarch, you may want to simmer the sauce for an extra 1–2 minutes to allow it to reduce and thicken naturally.
4. Can I use a different sweetener instead of honey?
Yes. Maple syrup is the closest substitute (use the same ¼ cup). Agave nectar works as well, though it is sweeter than honey, so you may want to reduce it to 3 tablespoons. Brown sugar (¼ cup, packed) will create a deeper, molasses-like sweetness but will not be as glossy. For a low-sugar version, use a sugar-free honey substitute (like sugar-free maple syrup) or reduce the honey to 2 tablespoons and add 2 tablespoons of water.
5. Is this recipe gluten-free?
It can be. Use gluten-free tamari or coconut aminos instead of soy sauce. Ensure your cornstarch is gluten-free (most brands are). All other ingredients—shrimp, honey, garlic, olive oil, salt, pepper, green onions, sesame seeds—are naturally gluten-free. The recipe will taste nearly identical with these substitutions.
6. Can I add vegetables to this dish?
Yes. This is a great way to make it a complete one-pan meal. Add vegetables before adding the sauce. Good options include: broccoli florets (add 2–3 minutes before the shrimp, as they take longer to cook), snow peas or snap peas (add with the shrimp), bell peppers (sliced, add with the shrimp), zucchini (sliced, add with the shrimp), or mushrooms (sliced, add with the shrimp). If adding vegetables, you may need to increase the sauce slightly (add an extra tablespoon each of honey and soy sauce).
7. How do I store and reheat leftovers?
Store leftovers in an airtight container in the refrigerator for up to 2 days. Shrimp does not keep as long as chicken or beef. To reheat, the skillet is best: place leftovers in a skillet over medium-low heat with a splash of water or broth, and stir gently until heated through (about 2–3 minutes). The microwave works but may make the shrimp rubbery; heat in 20-second intervals on medium power. Do not freeze cooked shrimp dishes; the texture becomes mushy upon thawing.
8. Can I double this recipe?
Yes. Double all ingredients. Use a larger skillet (at least 14 inches) or cook the shrimp in two batches to avoid overcrowding. If cooking in two batches, transfer the first batch to a plate and keep warm while cooking the second batch, then combine and add the sauce. The sauce may take an extra 1–2 minutes to thicken because of the larger volume.
9. Why did my shrimp turn out rubbery?
Rubbery shrimp are almost always a sign of overcooking. Shrimp cook very quickly—usually 2–4 minutes total depending on their size. The visual cues: raw shrimp are gray and translucent; perfectly cooked shrimp are pink, opaque, and curled into a loose “C” shape. Overcooked shrimp are curled into a tight “O” shape and feel firm and springy rather than tender. To avoid overcooking, remove the shrimp from the heat as soon as they turn pink and opaque.
10. Can I use this sauce on chicken instead of shrimp?
Absolutely. For chicken: use 1 pound of boneless, skinless chicken breast or thighs, cut into 1-inch cubes. Season with salt and pepper. Cook in the skillet over medium-high heat for 5–7 minutes until golden brown and cooked through (internal temperature 165°F / 74°C). Then add the sauce and simmer for 3–5 minutes as directed. The cooking time will be longer than for shrimp.
11. Can I make this recipe in an air fryer?
Yes, with adjustments. Cook the shrimp in the air fryer first: preheat to 400°F (200°C). Toss the shrimp with 1 tablespoon of olive oil, salt, and pepper. Air fry for 4–6 minutes, shaking the basket halfway through, until pink and opaque. While the shrimp cook, prepare the sauce in a small saucepan on the stovetop (or in the microwave). Toss the cooked shrimp with the sauce and serve immediately.
12. Can I add heat to this recipe?
Yes. To make spicy honey garlic shrimp, add ½–1 teaspoon of red pepper flakes, 1 teaspoon of sriracha, 1 teaspoon of chili garlic sauce, or ¼ teaspoon of cayenne pepper to the sauce mixture. You can also garnish with sliced fresh chilies or a drizzle of chili oil. For a more complex heat, add 1 teaspoon of gochujang (Korean chili paste).
13. Why do I need to pat the shrimp dry?
Patting shrimp dry removes surface moisture. If the shrimp are wet when they hit the hot skillet, the moisture will turn to steam, which prevents browning. A proper sear (golden-brown spots) adds flavor, texture, and visual appeal. Wet shrimp will steam rather than sear, resulting in pale, rubbery shrimp. This step is not optional—it is essential for great results.
14. Can I use this recipe for meal prep?
This dish is best fresh, but it can be part of a meal prep strategy. Cook the shrimp and sauce as directed, but undercook the shrimp slightly (remove them when they are just pink, about 2 minutes total). Store in an airtight container in the refrigerator for up to 2 days. When ready to eat, reheat gently in a skillet until the shrimp are cooked through. Alternatively, prep the sauce and have the shrimp thawed and ready to cook, then make the dish fresh each time (it only takes 15 minutes).
15. What should I serve with this dish?
This dish is versatile and pairs well with many sides. For a low-carb meal: serve over cauliflower rice, zucchini noodles, or a bed of steamed greens (spinach, bok choy, or kale). For a traditional meal: serve over steamed jasmine rice, brown rice, or lo mein noodles. For a fresh, light meal: serve in lettuce wraps (butter lettuce or romaine leaves) with shredded carrots and cucumber. Steamed or roasted vegetables (broccoli, asparagus, snap peas) are also excellent.
16. Can I use the tails-on or tails-off shrimp?
Either works. Tails-on shrimp are more visually appealing and provide a convenient handle for eating. Tails-off shrimp are easier to eat (no discarding tails) and can be stirred more easily into the sauce. If leaving tails on, be careful not to burn them in the hot skillet. If you are serving over rice or noodles, tails-off are more convenient.
17. Why is there oil in the sauce and also oil for cooking?
The recipe has a slight inconsistency. For clarity: use 1 tablespoon of olive oil in the sauce mixture (this helps the sauce emulsify and adds richness). Use an additional 1–2 tablespoons of olive oil for cooking the shrimp (this prevents sticking and promotes browning). If you prefer to simplify, omit the oil from the sauce and just use 1–2 tablespoons for cooking; the dish will still be delicious.
18. Can I use this recipe for shrimp tacos?
Yes, absolutely. Prepare the honey garlic shrimp as directed. Serve in warm corn or flour tortillas with shredded cabbage, sliced avocado, a drizzle of lime crema (sour cream mixed with lime juice), and extra green onions. The sweet-savory shrimp pairs beautifully with the creamy, tangy toppings.
High-Protein Honey Garlic Shrimp: An Easy, Flavor-Packed Healthy Recipe
This high-protein honey garlic shrimp is a quick, flavorful, and healthy skillet recipe made with a sticky garlic glaze and tender shrimp.
- Prep Time: 5 minutes
- Cook Time: 10 minutes
- Total Time: 15 minutes
- Yield: 4 servings
- Category: Main Dish, Seafood
- Method: Skillet
- Cuisine: Asian Fusion
Ingredients
- 1 lb large shrimp, peeled and deveined
- 1/4 cup honey
- 4 cloves garlic, minced
- 2 tbsp soy sauce
- 1 tbsp olive oil
- 1 tsp cornstarch (optional)
- Salt and pepper to taste
- 2 green onions, sliced
- Sesame seeds (optional)
Instructions
- Pat shrimp dry and season lightly with salt and pepper.
- Mix honey, garlic, soy sauce, and olive oil in a bowl.
- Heat oil in skillet over medium-high heat.
- Cook shrimp 2–3 minutes until pink.
- Add sauce and toss to coat evenly.
- Simmer 3–5 minutes until sauce thickens.
- Garnish with green onions and sesame seeds.
- Serve warm immediately.
Notes
- Do not overcook shrimp or they become rubbery.
- Add chili flakes for heat.
- Serve with rice or steamed vegetables.